 Before you start - check with
your adult helper where you can do your tie dying! Dye stains don’t come
out, so do it outside if you can – a bit of dye on the grass is better than on
the carpet or kitchen table.
Before you start - check with
your adult helper where you can do your tie dying! Dye stains don’t come
out, so do it outside if you can – a bit of dye on the grass is better than on
the carpet or kitchen table.
Wear old clothes and plastic or rubber gloves. And ask your adult helper to read the instruction with you (and to read technical bits at the end) before you start.
We hope you enjoy tie-dying your
own t-shirts as much as we do…
Becci, Maggie May and William
Ingredients
·
T-shirts – white ones are
best but light colours can work
·
Fabric dye
·
Salt
·
Water
·
Plastic bowl and an old
wooden or plastic spoon for stirring
· Old table (or plastic sheeting / oilcloth covering)
· Adult helper
(Dye catcher for washing is also useful- see technical bits)
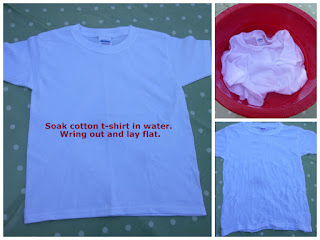 Put the t-shirts in cold water so
they are wet all the way through. Squeeze most of the water out of
the t-shirts. Open them flat then fold, roll or scrunch each one up in whatever style
you like.
Put the t-shirts in cold water so
they are wet all the way through. Squeeze most of the water out of
the t-shirts. Open them flat then fold, roll or scrunch each one up in whatever style
you like.
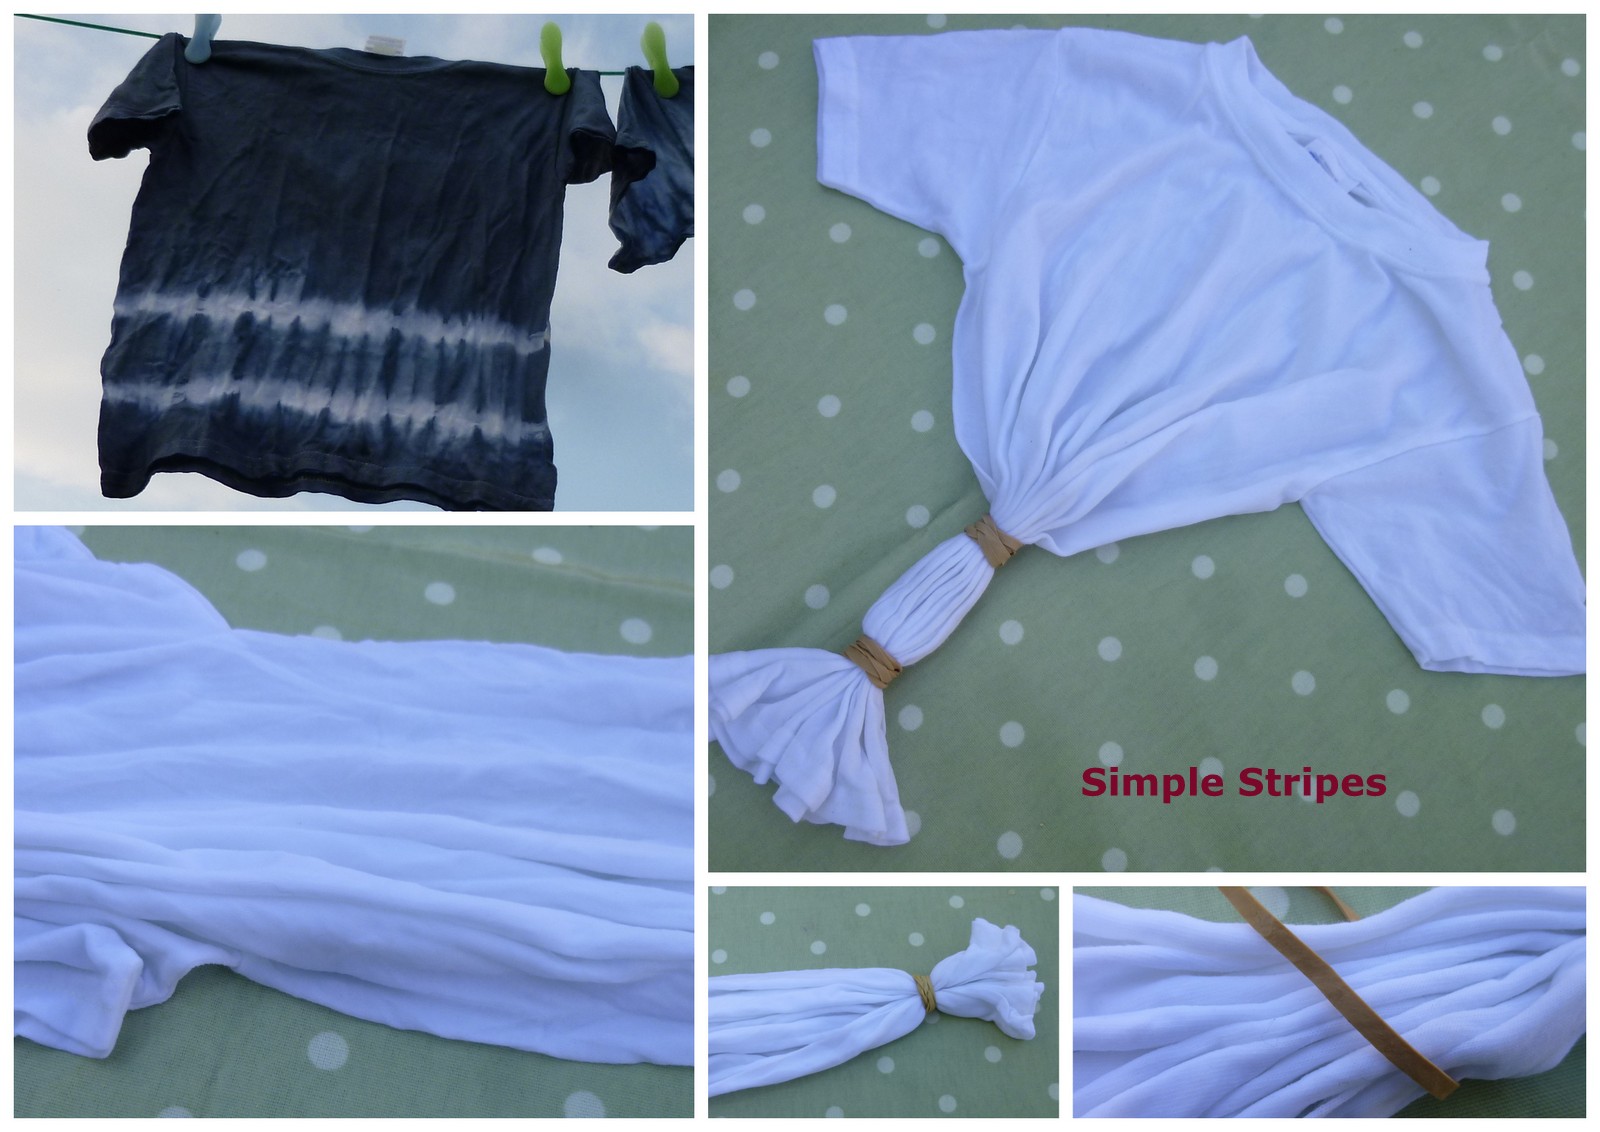
We've showed you how to do a simple stripe - but we have more photos at the end for other patterns.
Fold or pleat your t-shirt neatly and use elastic bands or string to tie it up - we used 2 but you can add more if you want more stripes. Make sure they are tied really tight to
stop the dye getting in where you don’t want it. Adults are great at
this.
Ask your adult helper to help mix up the
dye in a plastic bowl. Tell them to follow
the instructions on the packet – you usually have to dissolve the dye in water
and then add salt – don’t forget this bit - the salt makes the dye come out a
strong colour and stops it fading too much.
Stir the mixed dye well with an old
spoon – we love using wooden ones as the dye turns the spoon a great colour.
Put the tied up t-shirts into the
bowl of dye. Use gloves and put them in carefully - don’t drop it in – it will
splash dye everywhere and you don’t want it in your eyes! And use the spoon to
push the t-shirts under the dye and to stir them.
Leave the t-shirts in the dye for
as long as the instructions say – some dyes take ages and ages to work, others
are really quick. But don’t take them out early or the dye will fade too much when
you wash them.
 When the time is up, ask your
adult helper to carry the bowl of dye to the sink. Tell them to be careful not to
spill any on the floor!
When the time is up, ask your
adult helper to carry the bowl of dye to the sink. Tell them to be careful not to
spill any on the floor!
Wearing gloves, take the tied up
t-shirts out of the bowl of dye and put them in the sink. Turn on the cold tap
but don’t put the plug in - just swish the tied up t-shirts around in lots of running
water.
When most of the spare dye colour
is washed away, you can untie the t-shirts. Ask your adult helper to help if
you can’t undo the knots or elastic bands. Keep swishing the t-shirts around
in cold water until no more dye colour comes out.
 This is the really exciting bit - when
you get to see what your t-shirt looks like. Remember each one is supposed to
look different so they won’t be exactly like ours. And they may look a bit
bright at first but they will fade a bit when you wash them.
This is the really exciting bit - when
you get to see what your t-shirt looks like. Remember each one is supposed to
look different so they won’t be exactly like ours. And they may look a bit
bright at first but they will fade a bit when you wash them.
Finally put your t-shirts in the
washing machine and ask your adult helper to wash and dry them so you can wear them.
Other ideas - as well as the Simple Stripe, we also did a Spiral Twist which twists the t-shirt in a flat spiral pattern before tying. And Scumble - scrunching t-shirt up (little bits at a time) into a flat round shape, and Target - pinching the t-shirt from the middle into a cone and tying just like the stripes. There are lots of videos on YouTube to show you exactly how to do these.
 More than 1 colour - put just part of your tied up t-shirt into one bowl of dye - lean it
against the side of the bowl so you don't have to hold it for a long
time. When it's had enough color, rinse it carefully but don't untie it.
Then you can put the other part into another colour. This is sometimes called dip dying.
More than 1 colour - put just part of your tied up t-shirt into one bowl of dye - lean it
against the side of the bowl so you don't have to hold it for a long
time. When it's had enough color, rinse it carefully but don't untie it.
Then you can put the other part into another colour. This is sometimes called dip dying.
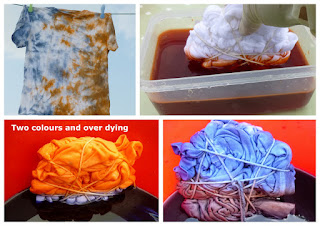
You can also "over-dye" by putting your already dyed t-shirt into another colour. This Scumble t-shirt was made by dip dying half in orange dye and then half in blue dye for a long time to get strong colours, then putting the orange part into the blue dye just for a little while - it came out a brown colour.
Have fun and experiment - the photo at the top of the page shows a t-shirt we tied in a different ways and dyed in lilac, orange and red colours.
Technical bits
Fabric dyes – you can
use most fabric dyes that are soluble in water – just follow the instructions.
Most use salt to fix the dye, but some specialist dyes use other fixatives so
check before you buy. Cold water hand dye products like Dylon are great for
first attempts – you can buy them at most supermarkets and fabric shops fairly
cheaply; they come in pre-measured dosages and only need salt - but they can take
a long time for the dye to take. You may want to distract the young dyers with
a good film while the t-shirts soak. You can use special dyes for the washing
machine too – but I don’t think the kids enjoy this as much as swishing the t-shirts around
in the bowls!
You should be able to do 4 or 5 kids t-shirts from a standard
dye packet – but you must be able to fit them all in the bowl so they are fully
submerged. If you can’t fit them all in, keep the dye for a second batch but
the colour will be paler so try leaving in longer.
Mixing and stirring - use old bowls and spoons, or ones you've bought for crafting - while home use dyes are safe to use if you follow the instructions, it's best not to use your current cooking utensils.
Supervision
and help – depends on the age of the child, but even older kids will
need help mixing the dye liquid as well as general safety supervision. You may need to help younger kids fold and tie
the t-shirts to get a good pattern – I usually do a few myself while “helping”
them do one each – that way there are lots to choose from at the end –
essential to prevent tears if one doesn’t work out!
Initial
washing instructions – between 40 and 60 degrees without detergent or fabric
conditioner. This first wash helps fix the dye but I usually add in a Dye
Catcher – also known as colour catcher – a small sheet of special paper fabric
that catch spare dye in the wash. Also great for washing new denim and other
non-colourfast clothes – you can buy it at supermarkets with the laundry
products. Subsequent washes can be as normal for cotton t-shirts – but try not
to wash at too high a temperature to preserve the colours.
This tutorial has been adapted from an article written by me for the Creative Crafting magazine (Crystal Lady Designs), and published in June 2014. You can see the original article in the Creative Crafting online magazine (on page 54).