So here goes - as well as
sharing the chart and the sizes of each piece, I also include a
mini tutorial on how to create triangle based quilt blocks without
cutting pieces on the bias.
 |
| Finished spreadsheet chart for the Welsh quilt inspired
central panel |
I wanted the centre to be quite large so I worked out a
chart that would give me a 26 inch square panel. I used a computer spreadsheet programme - changing the
sizes of the rows and columns to create a regular grid. I created coloured "shapes" to
represent the square and triangle pieces - just re-sizing and copying them to
get the right shapes and sizes to fit in with my ideas.
I could have used graph or squared paper to draw it up but I
use spreadsheets a lot so they are
quicker for me than re-drawing different designs.
Once I had a finished chart, I printed it off and was able
to measure out the lengths of the triangle diagonals. My scale was quite strange - I used 4
rows/columns to equal 6.5 inches which meant I had to do a few extra sums -
next time I'll have to be a bit cleverer and go for a 1:1 scale.
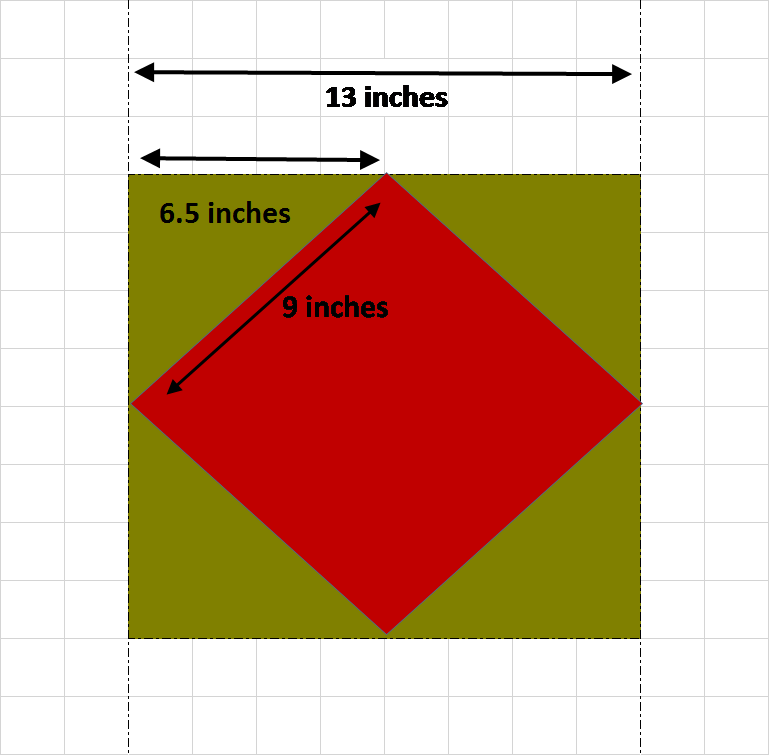
The diagram shows the sizes of each piece in this central
panel - all these are my
finished sizes - without seam allowances:
- the red corner pieces are 6.5 inch squares;
- the central diamond is a 9 inch square on
its side;
- the larger red triangles are 13 inches
along the longest side and the other two sides are 9 inches; and
- the smaller
green triangles are 9 inches along the longer side and 6.5 inches on the
shorter side.
This panel can be created by cutting out these pieces as triangles and squares
with seam allowances and simply piecing them together as in the above chart.
But as the Kaffe Fasset
shot cotton fabric I was using has a fine loose weave, I was a little worried
about cutting and using large triangle pieces on the bias as they could
stretch. So I decided to use a foolproof (or cheats) method - it means
you use much larger square and rectangle and stitch together along diagonal
folded lines and then cut away the excess. It does waste fabric but it sure
saves time and gives lovely triangles with less bias distortion. And I
reckoned the offcuts would be big enough to use for another part of the quilt
or another project.
If you'd like to find out more about this technique - here is a Mini Tutorial on how I made the red central
diamond with green corners block.
 |
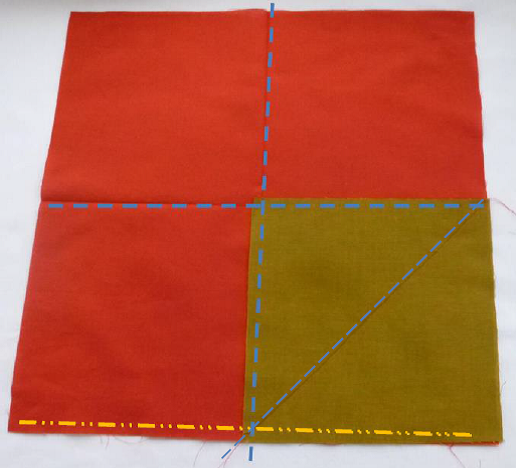
| Diamond in square patchwork block chart |
The overall finished size of this block is 13 inches square
- as shown in the diagram on the left.
Cut out a 13.5 inch square in red fabric - this includes 13
inches for the finished width of the block plus a half inch for seam and trim
allowances. Fold the large red square into quarters and press to create creased
lines dividing it into 4 equal sections.
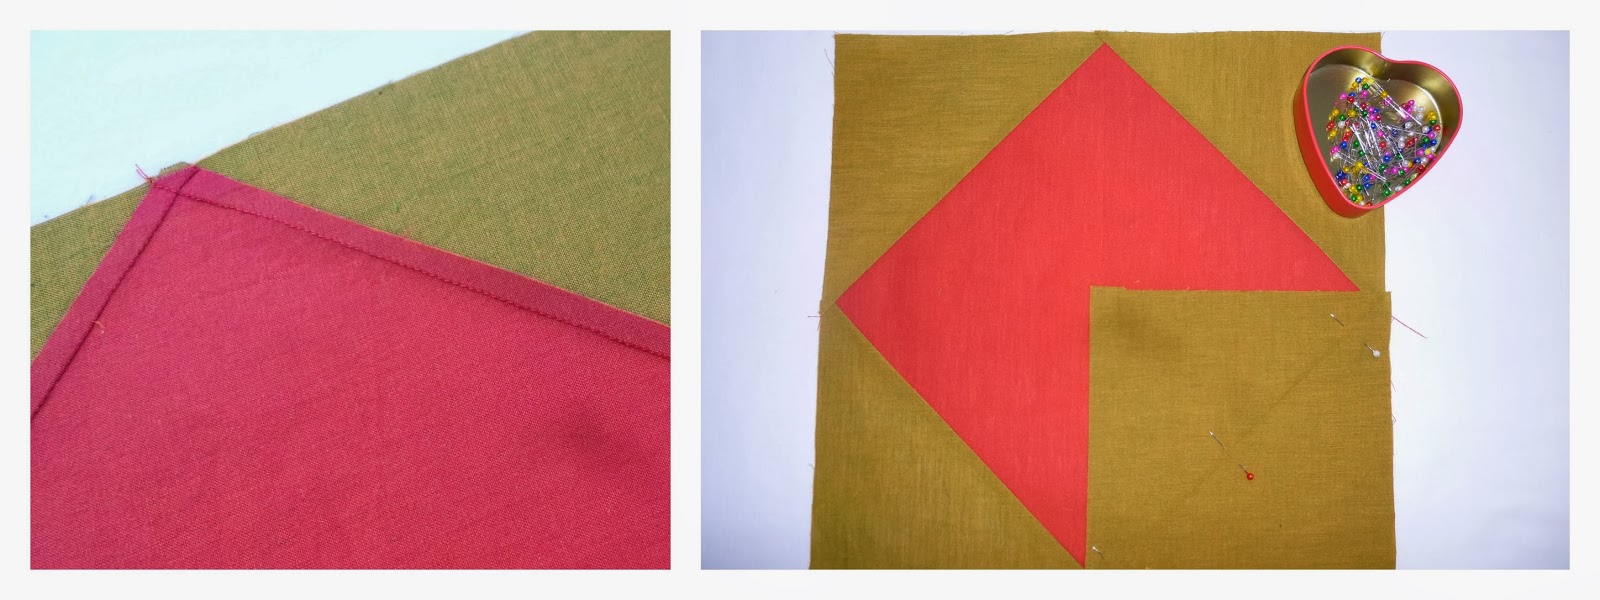
Cut out 4 squares in green, each measuring about 7.5 inches
square - and fold them diagonally into a triangle. The diagonal will measure
about 10 inches (the finished diagonal measurement of 9 inches plus an inch for
seam and trim allowances.) Press the green "triangle" to get a good
crease line on the diagonal. (To prevent stretching on the bias - press down
with your iron rather than gliding it across the fabric.)
 |
| Diamond in square patchwork block - diagram 1 |
Open a green triangle back into a square and place on one
corner of the red square - it will be bigger than each quarter of the red piece
as marked by the crease lines – shown as blue dashed lines in diagram 1.
Line up the green square in such a way that the diagonal
crease on the green square intersects with the creases on the red fabric at a
distance away from the edge of the red square that is equal your seam allowance
- shown by the yellow dashed line in diagram 1.
The diagonal creased line will be your stitching line. You
may want to test the position by folding the triangle along this crease towards
the outside of the red square to see how it sits before you sew it.
 |
| Diamond in square patchwork block - diagram 2 |
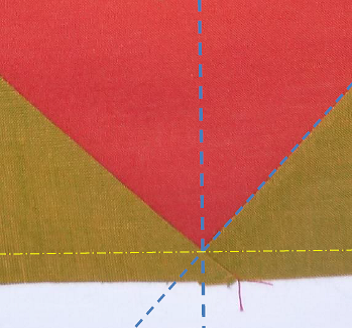
Once happy with the position, pin and stitch along the
diagonal line using a standard stitch.
Fold green fabric back again to check it is sewn correctly
before cutting away excess layers of fabric.
If you are happy, open triangle
out and cut away the excess fabric on the OUTSIDE of the square - a single
layer of green and red triangle along the seam allowance line (shown as the red
dashed line in diagram 2 ) outside the stitched line.
 |
| Diamond in square patchwork block - diagram 3 |
After cutting, fold open the green triangle piece - you now
have a green triangle sewn along the diagonal of the larger red fabric.
Press -
with seam allowance towards the outside.
Repeat this process for all four corners.
 |
| Diamond in square patchwork block - diagram 4 |
If you have
carefully intersected the crease lines on the seam allowance, you will find the
green triangles overlap nicely on this allowance line - shown as a yellow
dashed line in diagram 4. But don't worry though if they are a little bit out.
You can cut away the
little ears where the triangle corners overlap edges and you may
find you need to trim your block so it is a perfect square.
The other sections of the panel were created in the same way - using rectangle and square pieces not triangles. All sections were then pieced together in rows, matching up points and corners carefully.
So here is the finished central panel and I added a straight border with mitred corners using one of the Kaffe Fasset Stripe fabrics - it was a bit fiddly to get the stripes to match up and sit right on the corners - but well worth the effort.
I've already started on the next section - using some more stripes to create a zig-zag border that reminds me of mountains..... click here to go to the post.